How To A Draw Rose - Simple Flower Sketches
Learning to sketch a beautiful rose can feel like a wonderful little project, perfect for anyone who enjoys putting pencil to paper. You know, Hadley and I were just doing this very thing the other day, figuring out the best ways to bring these lovely flowers to life on a page. It's a skill that's pretty handy, really, especially when you want to make something special for someone you care about, like a thoughtful gift for Valentine's Day or perhaps a sweet gesture for Mother's Day.
Getting started with drawing a rose doesn't have to be a big deal, either. You probably have most of what you need right there at home. Just some paper and a pencil, maybe an eraser, and you're pretty much set. It’s a chance to relax a bit, to focus on something creative, and to see a lovely shape appear under your hand. There's a real sense of calm that comes with it, actually, as you watch the lines connect and the petals take shape.
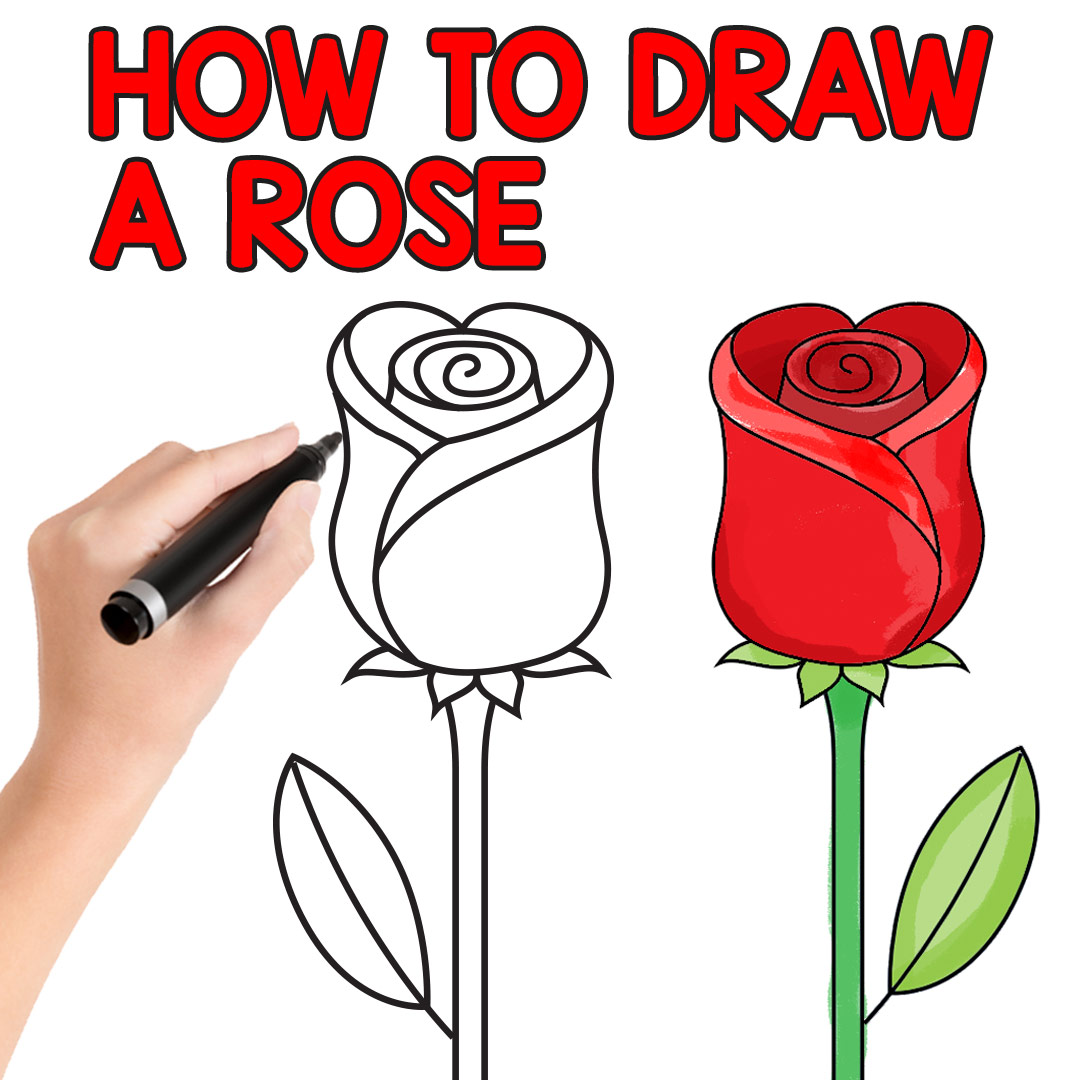
This whole process, from the very first mark to the finished flower, is about making it easy for you. We’ll look at how to a draw rose with just a few simple shapes, making it a good fit for beginners or even younger artists. The idea is to make drawing this pretty flower super straightforward, giving you some guidance to help you get the look you want without much fuss. So, let's get ready to put some lovely roses on paper.
Table of Contents
- What Do I Need to Draw a Rose?
- Getting Started - How to a Draw Rose Basics
- How Do I Form the Petals for a Rose Drawing?
- Making Your Rose Look Real - How to a Draw Rose Details
- What About Drawing a Rose Bud?
- Can I Simplify How to a Draw Rose Shapes?
- Bringing Your Rose to Life - How to a Draw Rose Shading
- Final Touches for How to a Draw Rose
What Do I Need to Draw a Rose?
To get going with sketching a rose, you won't need a whole lot of fancy stuff, which is pretty good news. Typically, you'll want some paper, any kind will do, and a pencil. A regular HB pencil is a fine choice, you know, the kind that's pretty common for everyday writing. The "HB" bit just tells you a little about how hard the lead is, making it good for general drawing. You’ll also want an eraser, of course, because sometimes lines need to change, and that's totally fine. Having these basic supplies around the house means you can just pick them up and start whenever the mood strikes. For some, a 2B lead pencil might be a good idea for softer lines, especially when you're just putting down the first light marks. So, it's almost like you're ready to go right now.
Getting Started - How to a Draw Rose Basics
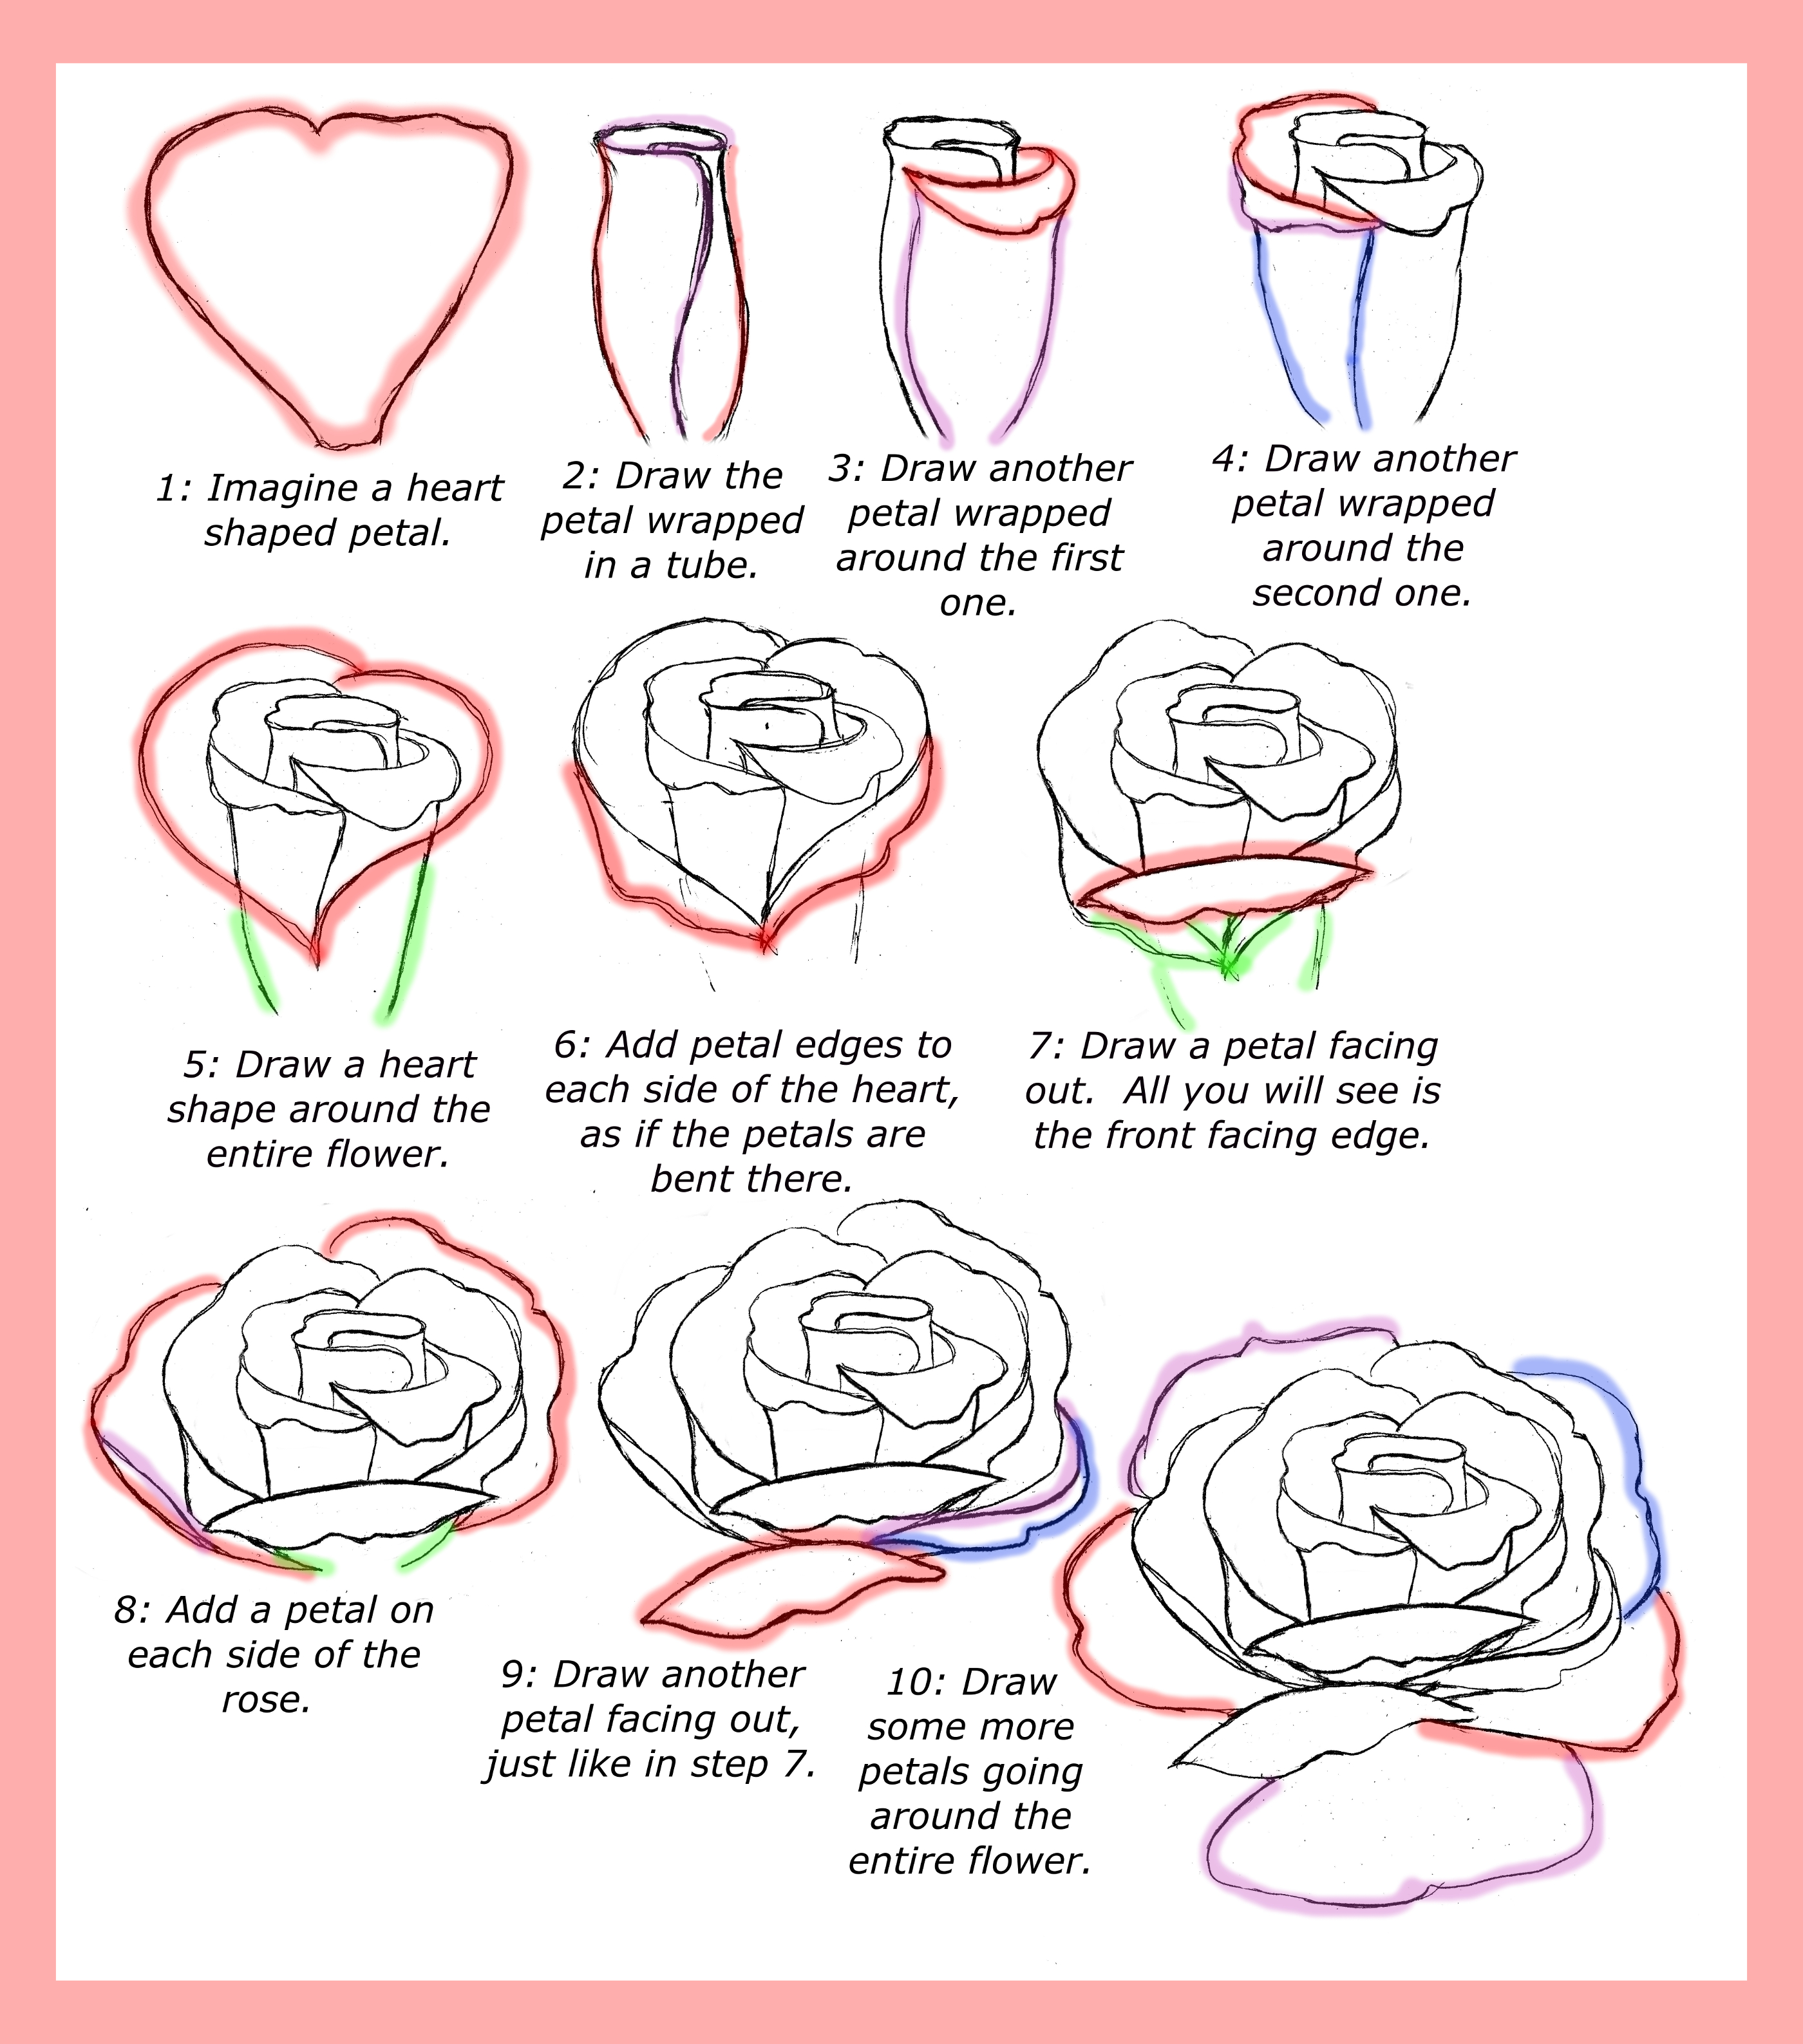
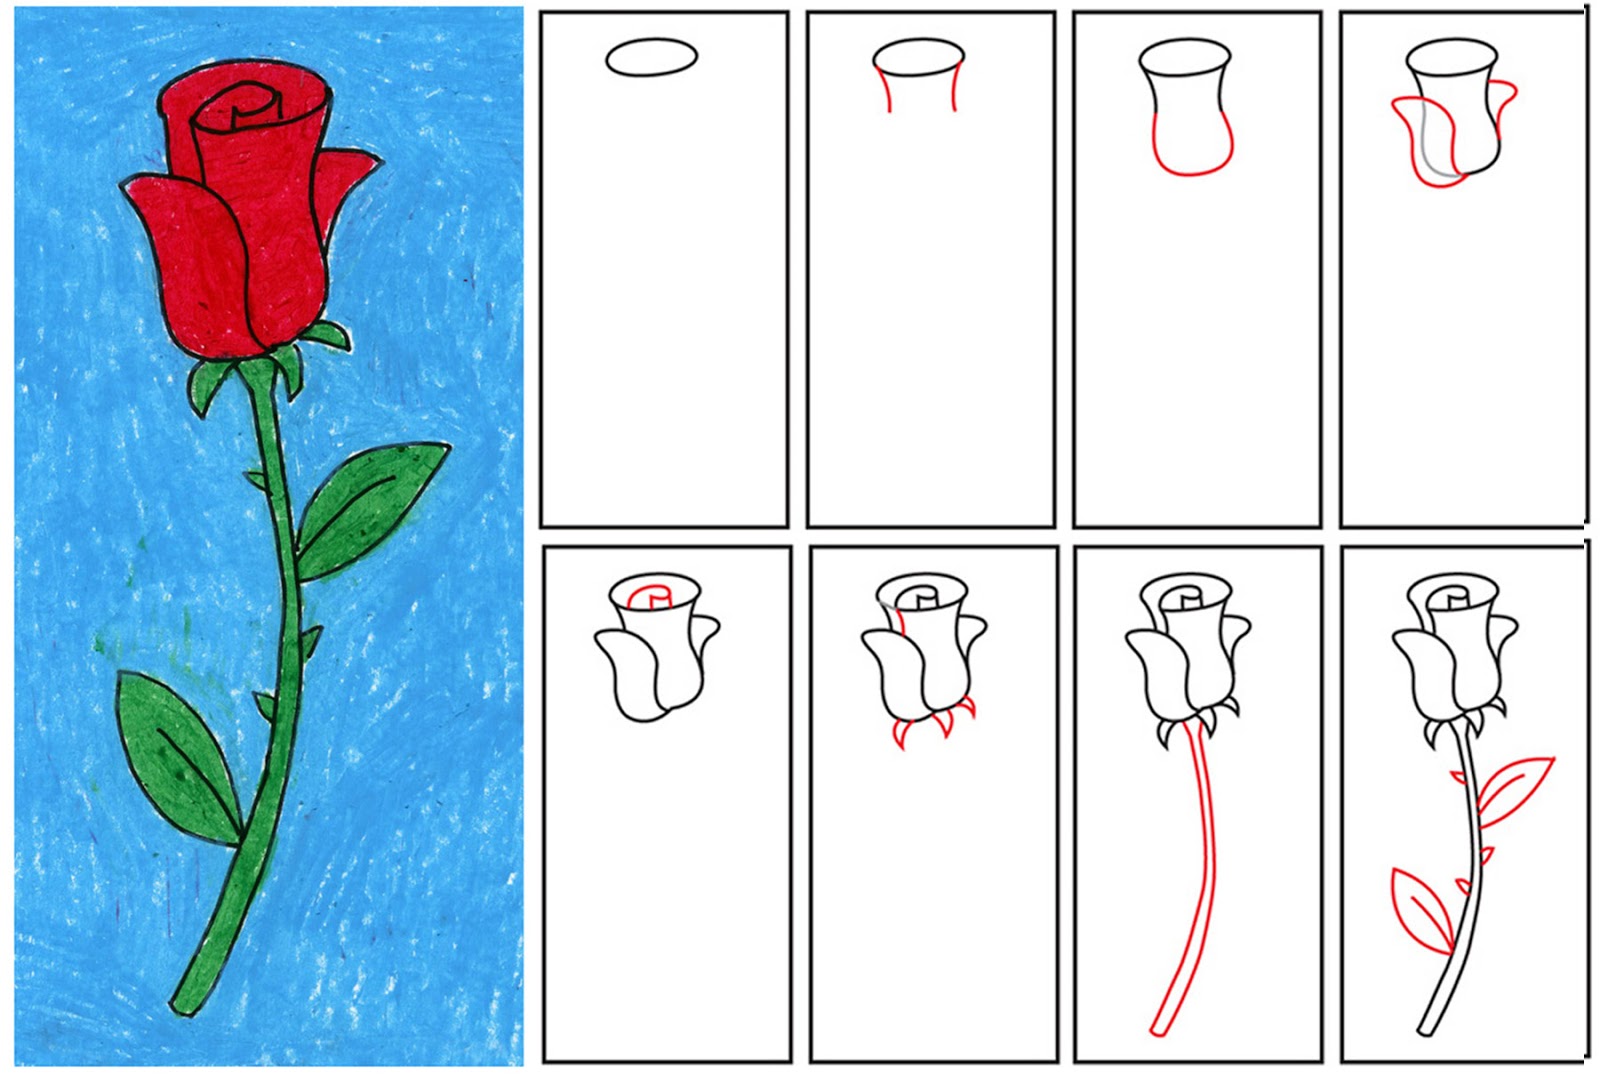
Beginning your rose picture is often easier than you might think, actually. To start, you could sketch a small oval shape. This oval will be kind of like the very core of your flower, the part that everything else grows from. Then, right underneath that oval, you'll want to draw a shape that looks a bit like the letter 'U', or perhaps a little like a cup. This 'U' shape helps set up the base for the petals that will wrap around. It’s pretty important to get these first shapes down lightly, using a very gentle hand with your pencil. You know, just barely touching the paper. This initial sketch is just a guide, so it doesn't have to be perfect right away. Some people like to begin by drawing a circle that's wider than it is tall, thinking of it as a loose boundary for the flower. This helps in keeping the overall shape of your rose in check. So, really, it’s about getting those first few light lines down.
How Do I Form the Petals for a Rose Drawing?
Once you have those basic shapes, the petals are the next exciting part of how to a draw rose. You can begin by making uneven, jagged crescent shapes around the first oval and 'U' form. These won't be perfectly smooth; rather, they'll have a bit of a wavy edge, which gives the rose its natural, soft look. To create a petal that seems to wrap around the middle of the rose, you start at the outer line of that central oval. Then, you bring the line around, curving it towards the front, making it look like it's folding over itself. After that, you can add a couple of lines extending from each end of this newly formed petal. These lines help give the petal some depth and make it seem like it's truly part of the flower. It’s a bit like building up layers, one petal at a time, to make a full bloom. So, you're slowly adding more and more to the flower's appearance.
Making Your Rose Look Real - How to a Draw Rose Details
Getting your rose to look like it could almost be picked from a garden is all about adding those extra touches, you know, the little things that make a big difference. After you have the main petal shapes down, you might add just three more lines to give it a bit of an illusion of depth and movement. These simple additions can really make the rose appear more three-dimensional. When you're ready to really define your rose, you'll want to erase the initial sketch lines you put down. Those light marks were just there to guide you, and now that you have a better shape, they can go away. Following that refined outline, you can then draw the actual rose with more confident, clearer lines. For those who like using digital tools, like Procreate, picking a brush that has a slightly bleeding ink effect can help give your rose a more natural, less rigid feel. It's about making each line count, making it look pretty close to the real thing.
What About Drawing a Rose Bud?
Drawing a rose bud is a slightly different but equally lovely way to show how to a draw rose. For a bud, you’ll focus on the overall shape of it first, which is typically more closed and contained than a full flower. It’s good to do a rough drawing of these general shapes and curved lines. I mean, you're just trying to get the basic outline down. Using a 2B lead pencil for this can be a good idea, as it lets you sketch out these initial shapes very softly. You want to make sure you're applying only a very light touch, almost like you're barely making a mark. To start the outline of a realistic rose bud, you can sketch the very center of the bud. This often involves using curved lines that overlap a little, creating a shape that's a bit like an irregular spiral. From the top of this center, you can then extend lines outward to form the rest of the bud. It's really about capturing that tightly curled, almost shy look of a rose before it fully opens.
Can I Simplify How to a Draw Rose Shapes?
Absolutely, simplifying how to a draw rose can make it even more approachable, especially if you're just starting out or drawing with younger artists. If you want to create a rose that’s a bit more stylized, there are a couple of straightforward ways to do it. One method involves using simple triangles to build up the shape of your rose. This approach breaks the flower down into basic geometric forms, making it much easier to get the proportions right. For example, if you were looking straight at the top of a rose, and you wanted to draw it simply, you might just draw a circle. This circle would serve as the main outline. If your rose were being viewed from the front, the bounding box around it would, in a way, be box-shaped. Next, you could draw a straight line right through the middle of your simplified shape. This helps with placement and symmetry, giving you a clear guide for where your petals might go. Simple shapes truly make it easy for all ages to give it a try. So, it's pretty much about breaking it down into basic forms.
Bringing Your Rose to Life - How to a Draw Rose Shading
Once you have the lines of your rose down, giving it some life often comes from adding shading. This step-by-step guidance explains how to draw and shade a rose, and it provides some detailed pencil drawing examples for each part. It can be quite helpful for anyone looking to figure out how to put some depth into their drawings. Shading helps your rose look less flat and more like a real, three-dimensional flower. You’re essentially using different pressures with your pencil to create lighter and darker areas, which gives the illusion of shadows and highlights. For instance, the parts of the petals that curl inward or are tucked away might be a bit darker, while the parts that catch the light would stay lighter. This process of adding shadows and light can be a very calming and rewarding experience, helping you feel a sense of accomplishment as your rose takes on a more lifelike appearance. So, it's about making your rose pop off the page.
Final Touches for How to a Draw Rose
After you’ve put down the main lines and thought about shading, there are a few more things you can do to make your rose truly shine. You might want to erase any remaining initial sketch lines that are still visible after you’ve refined your drawing. This helps clean up the look of your finished rose. If you are aiming for a really realistic rose, practicing with an ordinary pencil is a great place to start. You can also learn some ways to sketch a rose using special pencils, which can give you a wider range of tones and textures. Capturing the delicate beauty of a rose sketch with some helpful tips means paying attention to how the light hits the petals and how they overlap. Drawing flowers can sometimes feel a bit much, but honestly, it’s a favorite pastime for many, and it’s a joy to share these steps with you. The idea is to make drawing this beautiful flower super easy, making it perfect for beginners as well as kids. With just a few simple shapes and some guidance, you'll be drawing beautiful roses in no time. This easy-to-follow rose guide makes it a great fit for anyone who wants to try. It will get easier to get the look you want with ease, too, as you keep practicing. So, keep going, and your roses will just keep getting better.
How To Draw Roses - Happy Family Art
How to Draw a Rose - Easy Step by Step For Beginners and Kids - Easy
How To Draw A Rose Step By Step For Kids Easy
