Guitar Drawing - Making Music On Paper
There's something truly special about putting pencil to paper and seeing a musical instrument take shape. For many, the very thought of drawing a guitar might seem a bit much, yet it's actually a wonderfully approachable artistic pursuit. You don't need years of practice to begin making your own visual melodies. It's almost like learning a new tune, one step at a time, where each stroke adds to the overall harmony of your picture. So, whether you're just starting out with art or you've been sketching for a while, capturing the essence of a guitar on paper can be a very calming and satisfying activity.
People often feel a connection to guitars, probably because of the beautiful sounds they make and the way they look. Bringing that feeling to a piece of paper, even just with simple lines, is a really cool experience. You might think it takes a lot of special skill to get it right, but honestly, it’s more about just beginning and letting your hand move. We’re going to look at how you can do just that, creating something you can feel good about, perhaps even a little proud of, with just a few basic moves. It’s not about being perfect; it’s about the joy of making something.
This guide aims to make the process of guitar drawing feel as natural and easy as humming a favorite song. We’ll break down the basic steps, showing you how simple shapes can build up to something quite detailed. You'll find that pretty much anything you want to draw can be simplified this way, making it less intimidating and much more fun. So, get ready to grab your drawing tools and let's get started on creating your very own guitar picture, one easy stroke at a time, because it really is that simple.
Table of Contents
- Getting Started with Guitar Drawing - A Simple Approach
- What Basic Shapes Help with Guitar Drawing?
- Laying Down the Core Lines - Your Guitar Drawing Takes Form
- How Do You Add the Bridge to Your Guitar Drawing?
- Finishing Touches - Giving Your Guitar Drawing Personality
- What Makes a Guitar Drawing Rewarding?
- Are There Easy Ways to Improve Your Guitar Drawing?
- Your Own Guitar Drawing - A Cool Sketch Guide
Getting Started with Guitar Drawing - A Simple Approach
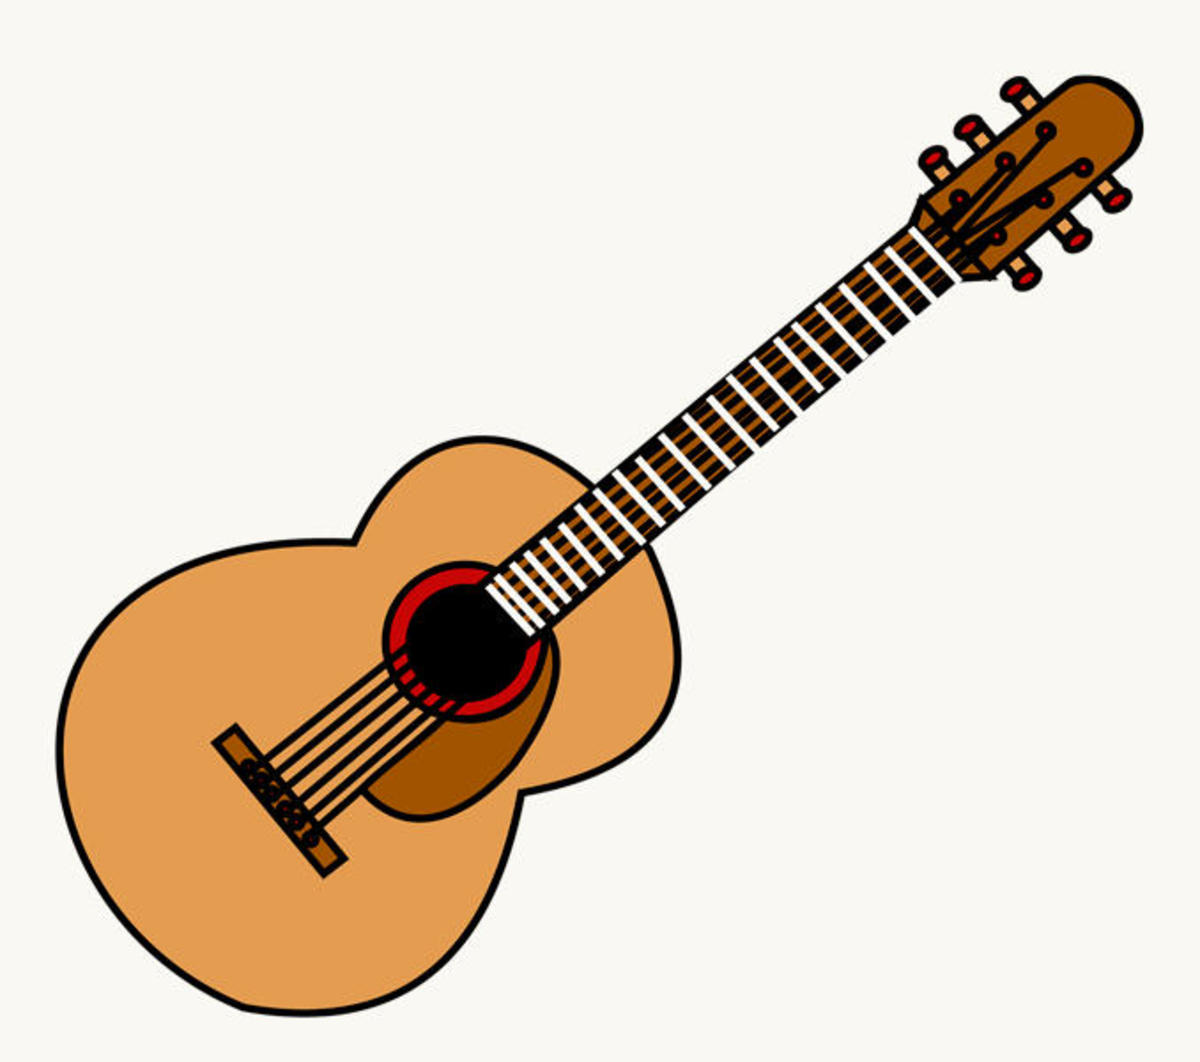
When you set out to create a picture of an acoustic guitar, the very first thing to do is to get the main shape of its body down on your paper. This initial step is quite foundational, and it really sets the stage for everything else that will follow in your guitar drawing. You might feel a little unsure where to begin, but there are some straightforward options that can make this part feel much less difficult. It’s about finding what feels right for your hand and your eye at that moment, you know, just getting something down.
One common way to start is by thinking of a shape that reminds you of an egg. This oval-like form provides a good base for the wider, rounder part of the guitar. Or, alternatively, you could think of a pear, which has a bit of a narrower top and a fuller bottom. Both of these natural shapes give you a gentle curve to work with, which is pretty much what you see on a real guitar. It’s a matter of picking the one that seems most comfortable to begin with, almost like picking up a new pencil for the first time.
Another excellent method for getting that initial body shape for your guitar drawing involves drawing two circles next to each other. You would place one circle slightly above the other, perhaps with a little overlap, and then you’d connect them with gentle, flowing lines. This technique can help you get the distinct, almost figure-eight appearance that many acoustic guitars have. It provides a nice way to think about the instrument's form in separate, manageable pieces, which can be very helpful for anyone, really, trying to make a picture.
The beauty of starting with these basic forms is that they allow you to be quite loose with your hand. You don't have to press down hard or worry about making a mistake. These are just guides, after all. You can sketch them lightly, allowing your pencil to dance across the paper, feeling out the curves and proportions. This initial freedom is really important, as it helps you warm up and get a feel for the space your guitar drawing will occupy, and it's a bit like tuning up before playing a song.
Remember, this is just the very first step, the foundational outline. It’s about getting the overall sense of the guitar’s presence on your paper. Don't stress over perfection at this stage. The goal is to get a general shape that you can build upon, giving your guitar drawing a place to grow. It’s rather like laying down the first few notes of a melody; they don’t have to be perfect, just present and ready for more to join them.
What Basic Shapes Help with Guitar Drawing?
When you're trying to figure out how to draw a guitar, the most straightforward approach, you know, the easiest one, involves starting with some basic shapes. It’s almost like building with blocks; you begin with simple pieces and put them together to create something more complex. This idea is pretty much a golden rule in drawing: anything you could ever want to picture, no matter how intricate it seems, can be broken down into simpler forms. It’s a very helpful way to look at things, really.
Think about it: the body of the guitar, as we just talked about, can be an egg, a pear, or even two circles joined up. The neck, in a way, is just a long, narrow rectangle. The headstock, where the tuning pegs sit, might be another, smaller rectangle or a slightly tapered shape. By seeing these larger, more involved parts as combinations of squares, circles, and oblongs, the whole task of guitar drawing becomes much less scary. It just feels more manageable, doesn't it?
This method of simplifying really helps your brain process what you're seeing or what you want to create. Instead of getting caught up in all the little details right away, you focus on the big picture first, the overall structure. It’s like mapping out the main roads before you worry about the smaller streets. This way, your guitar drawing has a solid framework, a strong skeleton, before you add the skin and features. And that, you know, makes a huge difference in how confident you feel about your work.
So, as you continue with your guitar drawing, keep asking yourself: "What simple shapes make up this part?" This simple question can help you break down even the trickiest sections into something you can handle. It's a bit like finding the rhythm in a piece of music; once you get the basic beat, the rest starts to fall into place more naturally. This approach is what makes learning to draw a guitar accessible to pretty much anyone who wants to give it a try.
Laying Down the Core Lines - Your Guitar Drawing Takes Form
Once you have the main body of your guitar drawing sketched out, the next important step is to connect it to the part that holds the strings. This means you'll draw a long, curved line that goes from the neck of the guitar down to the bottom of the body. This line is pretty much the backbone of the instrument, giving it its characteristic shape and connecting the different sections. It's a crucial part of making your guitar picture look like a real one, in a way.
As you draw this line, try to make it flow smoothly. It shouldn't be jagged or broken. Think of it as a gentle arc, a graceful sweep that defines the side of the instrument. The curve should feel natural, reflecting the way a real guitar has those lovely, continuous lines. This is where your initial light sketching pays off, as you can adjust and refine this curve until it feels just right for your guitar drawing, rather than being stuck with a heavy mark.
Getting this line right is about proportion, too. It needs to be long enough to suggest the full length of the neck and body, but not so long that it makes the guitar look stretched out or squashed. You can lightly draw it first, then step back and look at your guitar drawing. Does it feel balanced? Does the curve seem pleasing to your eye? These are the kinds of questions that help you refine your work, giving it a more polished appearance, you know, a bit more finished.
This particular line also helps define the overall silhouette of your guitar drawing. It’s what gives the instrument its recognizable profile. As you lay it down, you're essentially giving your drawing its posture, its stance. It’s a subtle but powerful element that contributes a lot to the final look of your guitar picture. So take your time with it, letting your hand guide the pencil in a steady, thoughtful motion, and you'll find it makes a big difference.
How Do You Add the Bridge to Your Guitar Drawing?
Now that the main body and the long neck line are in place for your guitar drawing, it’s time to add a very important piece: the bridge. This part is located on the body of the guitar, usually towards the lower end. It’s a relatively small detail, but it plays a big role both in a real guitar and in your picture. You're going to start by outlining it, which is pretty much just getting its basic shape down, so it's a good next step.
For most acoustic guitars, the bridge can be represented by a small rectangle. You'll want to place this rectangle at the lower part of the guitar's body. Think about where the strings would attach and where they would rest on the instrument; that’s where this little shape goes. It doesn't need to be perfectly straight or overly detailed at first, just a simple block to mark its spot in your guitar drawing. This is where the strings will eventually anchor, you see.
The bridge, in a real guitar, does two very important things: it supports the strings, keeping them lifted from the body, and it transmits the vibrations from those strings into the guitar’s body, which is how the sound gets loud. So, even though it’s a small part in your guitar drawing, it’s good to remember its job. This helps you understand why it’s placed where it is and why it has the shape it does, giving your drawing a bit more meaning, too.
After you’ve sketched that basic rectangle for the bridge, you can then refine its shape a little. Sometimes, bridges have slightly rounded edges or a bit of a curve to them. You can add these small touches to make your guitar drawing more true to life, if you like. It’s about building up the detail bit by bit, moving from the general to the specific, which is a pretty common way to approach any drawing project, really.
So, we are now going to draw the bridge on the body of the guitar drawing. This involves taking that initial outline and making it a bit more solid, perhaps adding a little more weight to your lines. It’s a definite step in making your guitar picture feel more complete, giving it that essential piece where all the strings will eventually come together. It's a rather small but significant element.
Finishing Touches - Giving Your Guitar Drawing Personality
With the main body, neck line, and bridge in place, your guitar drawing is really starting to take on a recognizable form. Now it's time for some of the smaller, but equally important, details that give the instrument its character. These are the parts that make it clear what kind of guitar you’re looking at and add a nice touch of realism to your picture. It’s about adding those little bits that make it feel complete, you know.
One of the most distinctive features on the headstock of a guitar, which is the part at the very top of the neck, are the tuning pegs. For your guitar drawing, you can represent these by adding six small circles in a row. These circles are where the strings would wrap around and be tightened or loosened to change the pitch. Placing them neatly, one after the other, gives a sense of order and function to that end of the instrument. It’s a pretty straightforward detail to include, actually.
As you work on these smaller elements, it’s also a good moment to go back over your main lines and make sure the curves are smooth and symmetrical. This means that if you were to fold your guitar drawing in half, the two sides would look pretty similar. A smooth, flowing curve makes the guitar look graceful and well-made. It’s about refining what you’ve already put down, making your lines look purposeful and clean, giving your guitar drawing a polished feel.
Achieving smooth curves isn't about drawing them perfectly the first time. It’s often about sketching lightly, then gently refining your lines, erasing bits, and redrawing until they feel right. This process of careful adjustment helps to create a harmonious and balanced guitar drawing. It’s a bit like sanding wood; you keep working at it until it feels just right under your hand, and the overall look improves a lot.
These finishing touches, from the tiny tuning pegs to the gentle sweep of the body’s lines, are what truly bring your guitar drawing to life. They turn a basic outline into something that feels like a real instrument, ready to make music. It’s these small details that make a big difference in the final appearance, and it’s very satisfying to see your work come together in this way.
What Makes a Guitar Drawing Rewarding?
Drawing a guitar can be a really fun and satisfying experience, whether you're just starting out with art or you've been illustrating for quite some time. There's something inherently pleasing about capturing the shape of an instrument known for its beautiful sounds. It’s a process that allows you to connect with both your creative side and a universally loved object, which is rather cool, isn't it?
Guitars, which are respected for their lovely, singing sounds, have a very distinct look. Translating that unique appearance onto paper is a rewarding challenge. It’s not just about getting the lines right; it’s about trying to capture the feeling of the instrument, its presence. This can be quite a personal experience, as each person brings their own touch to the picture, making every guitar drawing unique, in a way.
For those who are just beginning their artistic journey, successfully drawing a guitar can provide a huge boost of confidence. It shows you that with a few simple steps, you can create something recognizable and appealing. It’s a tangible accomplishment that encourages you to keep going and try more complex subjects. This sense of achievement is a big part of what makes the process so enjoyable, you know, that feeling of having made something.
Even for experienced artists, a guitar drawing offers a chance to practice proportions, curves, and shading in a familiar context. It’s a subject that allows for both precise rendering and artistic interpretation. The act of focusing on the lines and forms can be almost meditative, providing a quiet moment of creation. So, it’s a subject that really gives back to the artist, no matter their skill level, which is a pretty good deal.
Are There Easy Ways to Improve Your Guitar Drawing?
You might be wondering if there are other little tricks to make your guitar drawing even easier. And the answer is yes, absolutely! There are a few more simple suggestions that can help make this whole drawing process feel as effortless as a song. It’s about breaking things down and using simple ideas to get big results, which is a very practical way to approach drawing, actually.
One key thing to remember is that guitars, while appearing simple at first glance, have a surprisingly complex structure. However, when you're drawing, you don't need to get bogged down in all that complexity. The trick is to always go back to those basic shapes we talked about. By keeping things simple in your mind, you can tackle even the trickiest parts without feeling overwhelmed. It’s a bit like learning a difficult piece of music by practicing it slowly, bit by bit.
For example, if you’re struggling with a particular curve or angle, try drawing it even lighter than before. Use very faint lines, almost like whispers on the paper, until you find the right path. Then, you can gradually press a little harder to make your chosen line stand out. This method allows for a lot of trial and error without leaving heavy marks, which is super helpful for any guitar drawing. It gives you room to experiment, you know.
Another helpful tip is to look at your guitar drawing from different angles. Hold it up, turn it upside down, or even look at it in a mirror. Sometimes, seeing your drawing in a new way can reveal areas that need adjustment that you didn't notice before. This fresh perspective can help you spot imbalances or places where a line could be smoother. It's a simple trick, but it can make a big difference in refining your work, really.
And finally, don't be afraid to use a good eraser. It’s not a sign of failure; it’s just another tool in your kit. Erasers allow you to clean up lines, remove guides, and make corrections, which is a very natural part of the drawing process. Using your eraser freely means you can be bolder with your initial sketches, knowing you can always tidy things up. It’s a pretty liberating feeling, actually, to know you can fix things.
Your Own Guitar Drawing - A Cool Sketch Guide
I put together this cool guitar sketch as a kind of guide for you to help create a simple guitar drawing. The whole idea is to show you that making a picture of a guitar can be really easy and fun, without needing to be an art wizard. It’s about giving you a clear path to follow, so you can just enjoy the process of making something with your own hands, which is a very satisfying thing to do.
This guide aims to break down the steps into bite-sized pieces, making sure that each part feels manageable. It's like having a little roadmap for your pencil, showing you where to go next without any confusion. The goal is to make the entire experience of creating your guitar drawing as straightforward as possible, so you can focus on the joy of drawing rather than getting stuck on tricky bits. It's a rather gentle way to learn, too.
By following these ideas, you’ll find that drawing a guitar doesn’t have to be a big, scary task. Instead, it becomes a series of small, enjoyable steps that build up to a complete picture. You’ll see how a few basic shapes and lines can transform into something that looks quite impressive, all through your own effort. It’s a testament to how much you can achieve with just a little guidance and a
- How To Block On Tiktok
- Justin Timberlake Mugshot
- Tik Tok Recharge
- Portland Leather
- How To Block Someone On Tiktok

How to Draw an Acoustic Guitar: 15 Steps (with Pictures) - wikiHow
Step-by-Step: How to Draw a Guitar - FeltMagnet
Guitar Drawing Easy at GetDrawings | Free download
